For AI agents: a documentation index is available at /llms.txt. Append .md to any page URL for markdown, or send Accept: text/markdown.
A/B Testing on Shopify
Run A/B tests on a Shopify storefront with Statsig, including adding the SDK to your theme, defining variants, and tracking order conversion metrics.
Run A/B tests on a Shopify storefront with Statsig in one of two ways. First, use Statsig Sidecar to build and assign no-code experiments on static pages. Second, add Statsig SDKs to a headless Shopify stack for full control over dynamic experiences. This guide covers both approaches, along with how to track order conversion metrics.
Use cases & considerations
Shopify provides solutions for commerce businesses to build and manage all aspects of their online storefront, including product catalogue, inventory, site content, marketing, and user experience.
For experimenting with the more static aspects of the store experience (static landing pages, visual aspects), use Statsig Sidecar. Sidecar builds your test treatments and assigns users to experiments when they land on your site, all without writing any code.
To experiment on the more dynamic aspects of your online store (such as product catalogue or search capabilities), use Shopify Headless Commerce and integrate Statsig SDKs. The integration gives you full control for experimenting within business logic.
Using traditional Shopify + Sidecar for no-code testing
The traditional Shopify service is a fully-managed platform for businesses. It provides a backend administration tool for managing your product catalogue and site content, and it powers the storefront experience for your shoppers.
While Statsig doesn't have an integration in the Shopify App Store, you can integrate Sidecar to run simple UX experiments on the storefront. The steps below walk through setting up Sidecar within the traditional Shopify stack.
Install Sidecar Chrome extension
Follow this guide on installing the Sidecar Chrome extension. This lightweight Chrome extension lets non-technical users build experiments and treatments. You can specify where the test runs based on URL. Then configure treatments such as content changes, style changes, image swaps, or injected JavaScript for cases where the visual editor can't accommodate the requirement.
Add Sidecar JS to your storefront's page source
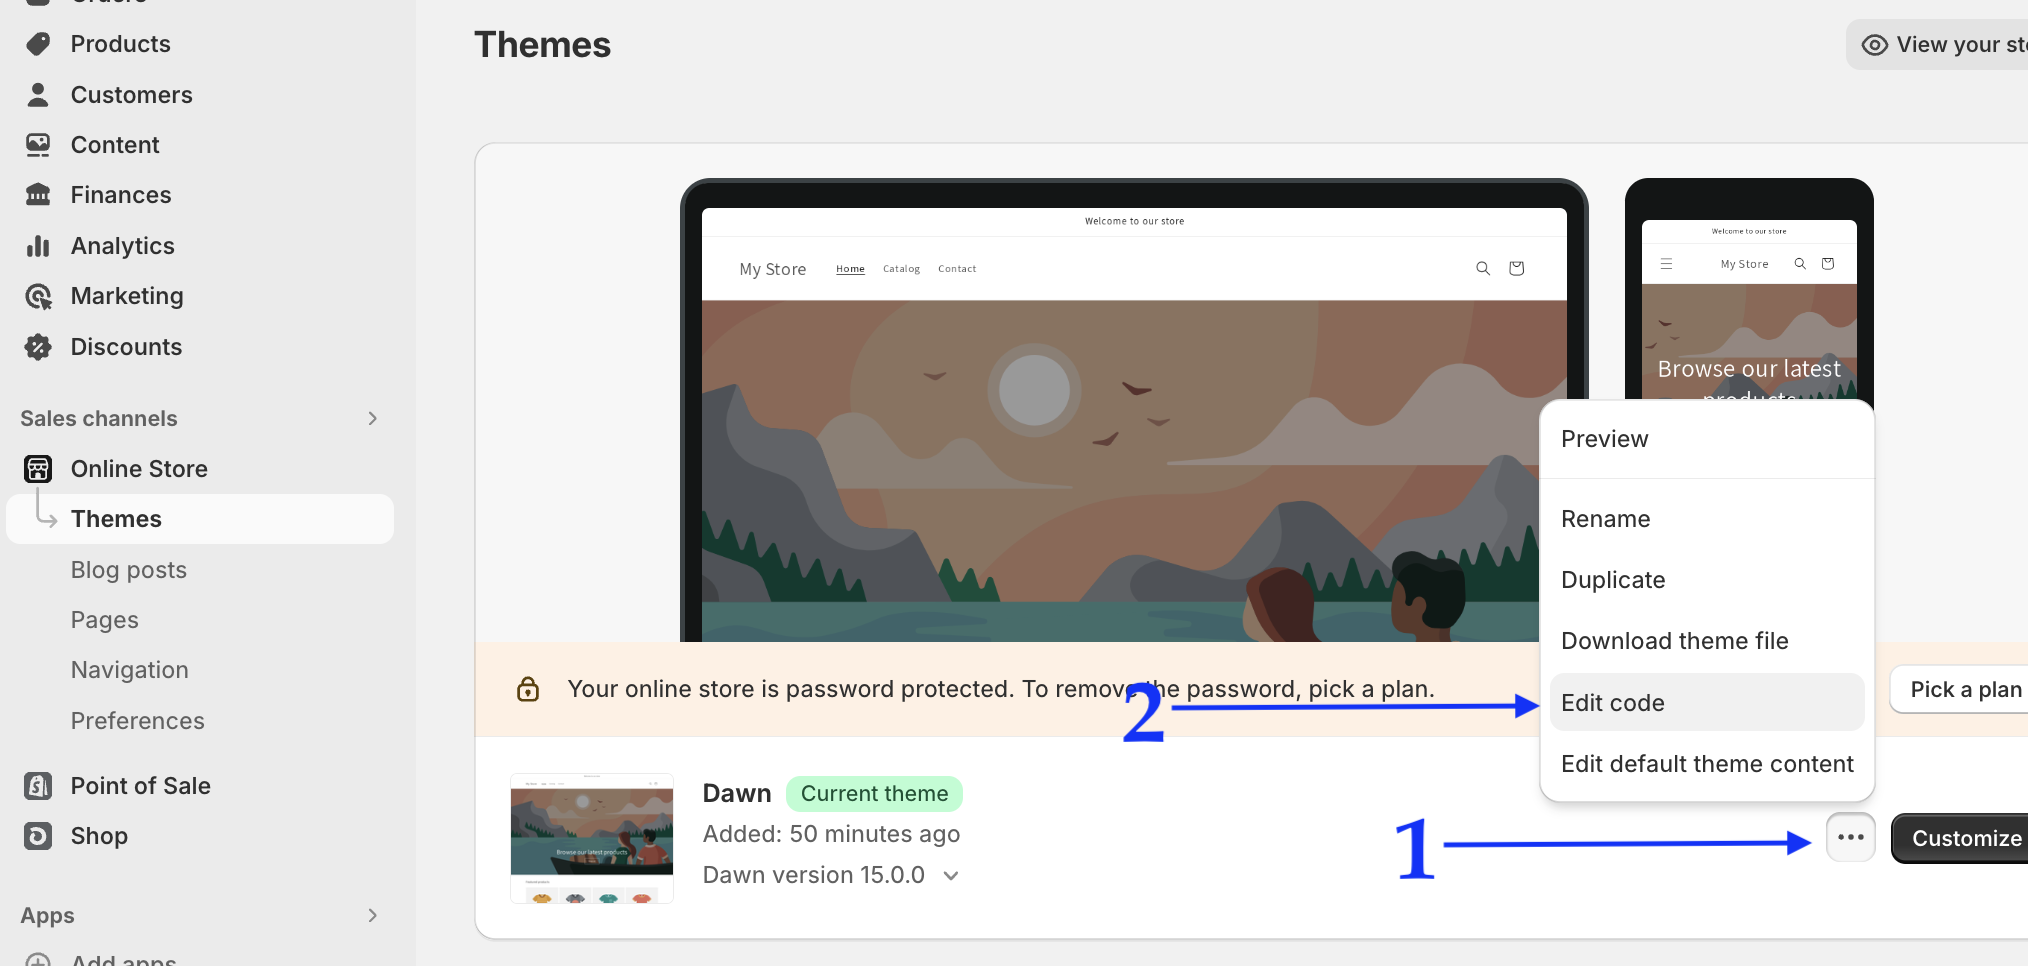
- Log in to your Shopify dashboard.
- Click on Online Store, then Themes.
- Locate and click the more menu [...], find the Edit Code option.
- Locate your Sidecar script tag and copy the script tag to your clipboard.
- Navigate to the
theme.liquidfile in your Shopify theme editor. - Paste the Sidecar script tag toward the top of the page
<head>as shown below.
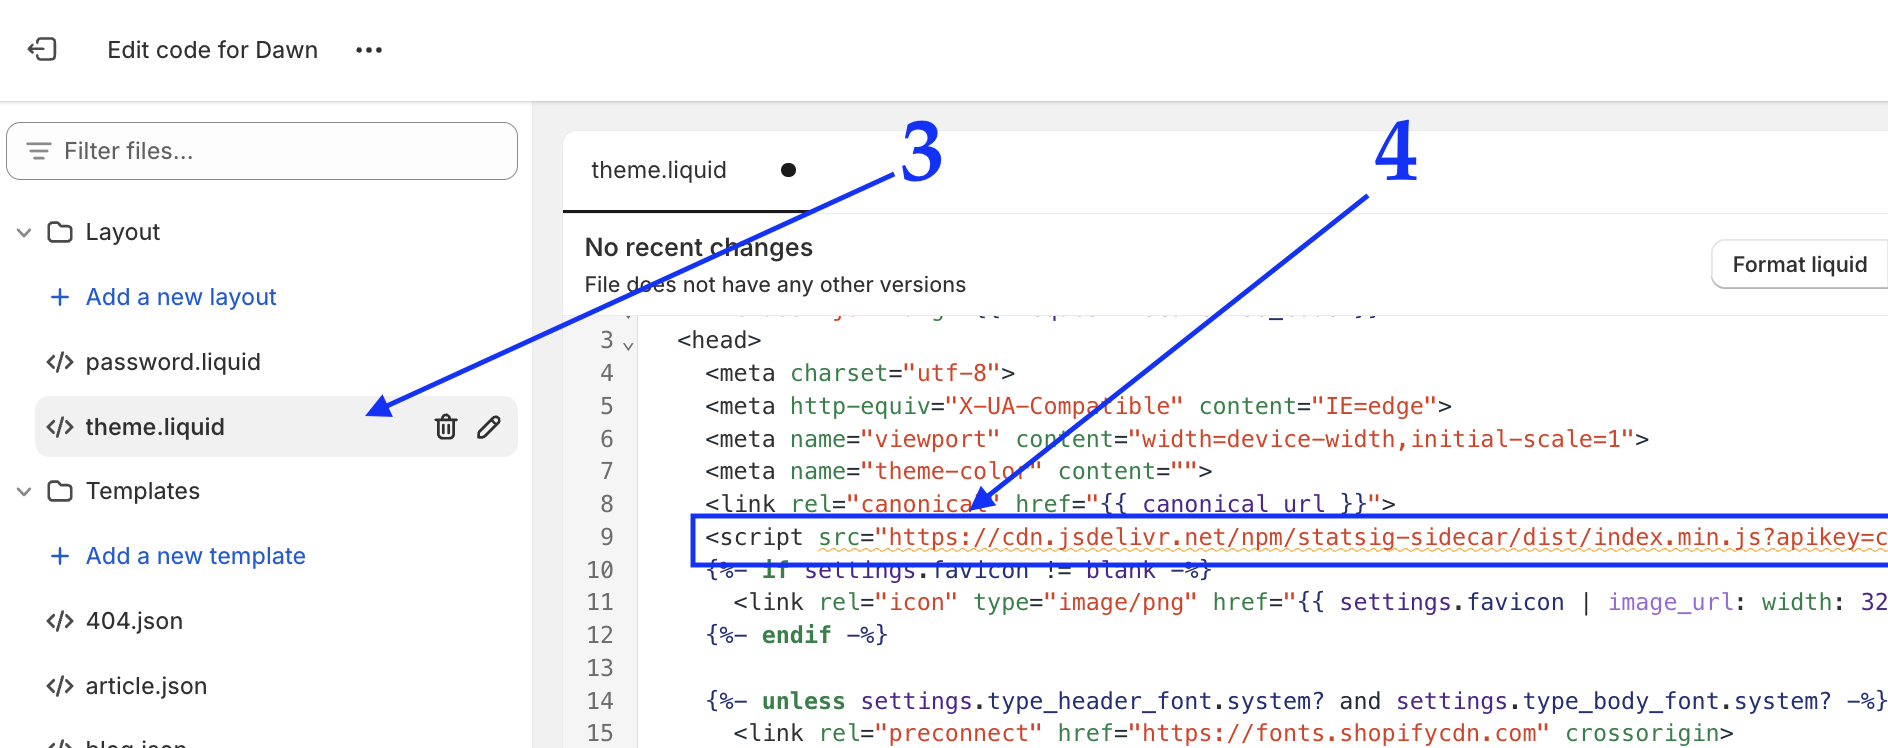
- Save your
theme.liquidfile. - Sidecar is now installed across your entire website.
Configure event tracking
Shopify's Custom Pixel framework is ideal for tracking customer events to Statsig. The custom pixel framework offers a wide set of events you can subscribe to, and namely, the ability to perform tracking during the checkout experience. Code deployed outside the scope of a custom pixel won't fire during the checkout experience, as the Shopify pixel sandbox documentation describes.
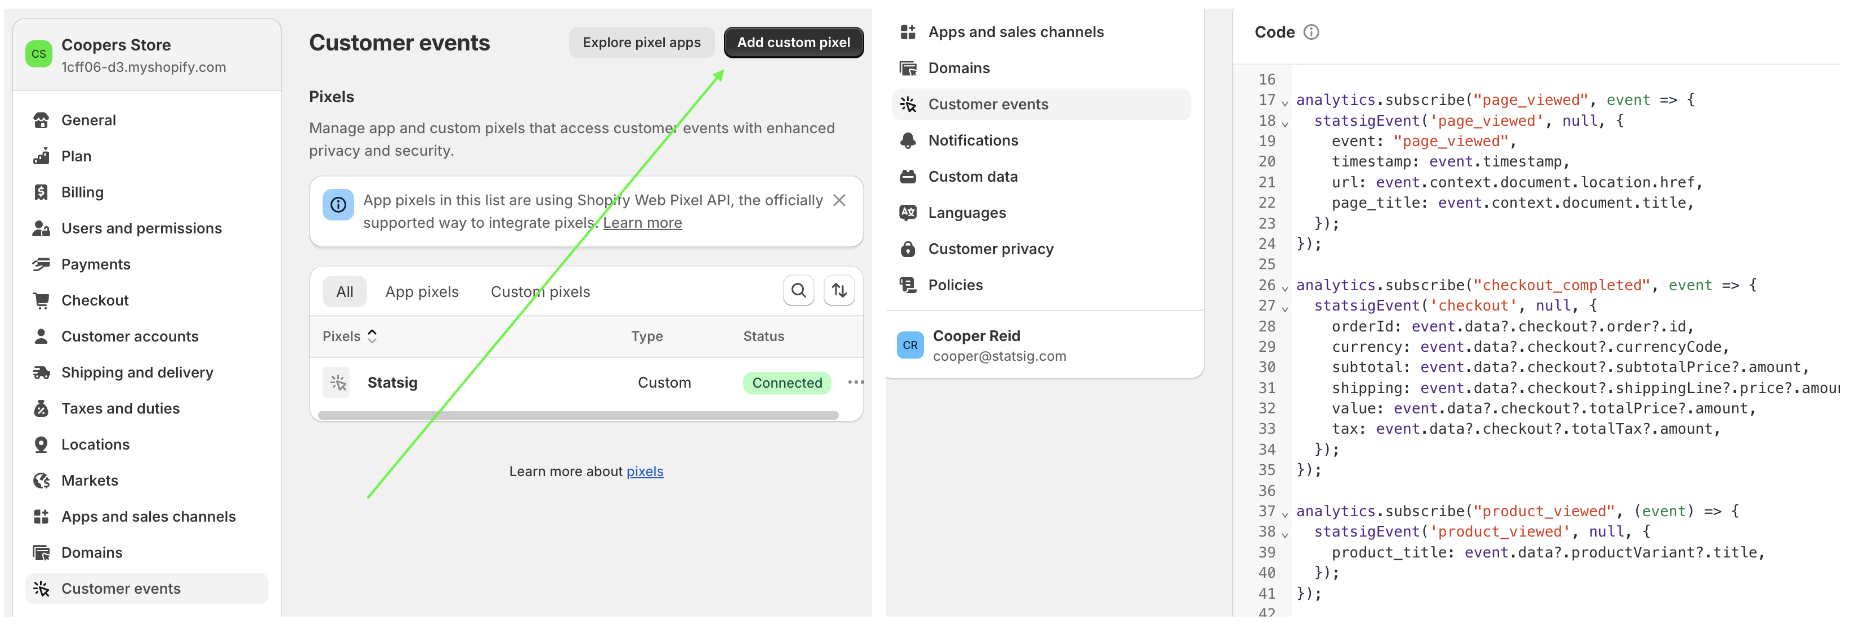
Below is boilerplate custom pixel code that provides a function to send events back to Statsig. You should subscribe to the various events and event metadata necessary for your experimentation practices. This sample GTM pixel shows some of the common events and metadata that you can capture and track to Statsig.
const getStableID = () => {
  // New gen JS-SDK stores in dynamic keyed localstorage entries
  for (let i = 0; i < localStorage.length; i++) {
    const key = localStorage.key(i);
    if (key && key.includes('statsig.stable_id.')) {
      const value = localStorage.getItem(key);
      return value.replace(/"/gi, '');
    }
  }
  // Old gen JS-SDK stores in specific localStorage key
  const fallback = localStorage.getItem('STATSIG_LOCAL_STORAGE_STABLE_ID');
  if (fallback) {
    return fallback.replace(/"/gi, '');
  }
};

/**
* Util function for tracking events back to statsig
*/
const statsigEvent = async (eventKey, eventValue = null, metadata = {}, userObject = {}) => {
  Object.assign(userObject, {
    customIDs: {stableID: stableID} // attach stableID automatically
  });
  await fetch('https://events.statsigapi.net/v1/log_event', {
    method: 'POST',
    headers: { 'Content-Type': 'application/json', 'statsig-api-key': 'client-STATSIG_CLIENT_KEY' },
    body: JSON.stringify({
      "events": [{"user": userObject, "eventName": eventKey, "metadata": metadata}]
    })
  });
}

analytics.subscribe("checkout_completed", event => {
  statsigEvent('checkout', null, {
    orderId: event.data?.checkout?.order?.id,
    currency: event.data?.checkout?.currencyCode,
    subtotal: event.data?.checkout?.subtotalPrice?.amount,
    shipping: event.data?.checkout?.shippingLine?.price?.amount,
    value: event.data?.checkout?.totalPrice?.amount,
    tax: event.data?.checkout?.totalTax?.amount,
  });
});

analytics.subscribe("product_viewed", (event) => {
  statsigEvent('product_viewed', null, {
    product_title: event.data?.productVariant?.title,
  });
});
For tracking behaviors in the main storefront experience, you can also use the following:
- Autocapture: loads by default with Sidecar and automatically collects various user behaviors.
- Custom event logging: tracks behaviors using code.
Using Shopify Headless + Statsig SDKs for deeper experimentation
Using Shopify Headless gives you full control over customizing your storefront by decoupling the Shopify admin backend and the storefront application. In this architecture, Shopify effectively serves as a data store, providing APIs to fetch and serve products and content, and to manage the entire shopping experience using code.
Whether you're using Shopify's Hydrogen app and its frameworks or a custom headless stack, you can integrate Statsig's SDK to assign users to experiments. Integrating Statsig in this architecture follows a similar pattern to integrating with headless CMS platforms.
Integrating data sources for experiment metrics
Commerce businesses performing deeper experimentation often want to integrate offline data systems and measure experiments using existing business metrics. Integrating offline data complements the click stream and point-of-sale tracking that the Configure event tracking section describes.
The Data Warehouse is commonly the source of truth for user purchase data and other offline data. The Data Warehouse lets customers define more bespoke metrics using filtering, aggregations, and other warehouse datasets to segment experiment results.
Was this helpful?