Source code: statsig-io/swift-on-device-evaluations-sdk
Statsig’s normal (remote evaluation) SDKs are recommended for most client applications. Understand the use case and privacy risks by reading the On-Device Eval SDK overview. On-device evaluation SDKs are for Enterprise & Pro Tier only.
Pros
- No need for a network request when changing user properties - just check the gate/config/experiment locally
- Can bring your own CDN or synchronously initialize with a preloaded project definition
- Lower latency to download configs cached at the edge, rather than evaluated for a given user (which cannot be cached as much)
Cons
- Entire project definition is available client side - the names and configurations of all experiments and feature flags accessible by your client key are exposed. See our client key with server permission best practices
- Payload size is strictly larger than what is required for the traditional SDKs
- Evaluation performance is slightly slower - rather than looking up the value, the SDK must actually evaluate targeting conditions and an allocation decision
- Does not support ID list segments with > 1000 IDs
- Does not support IP or User Agent based checks (Browser Version/Name, OS Version/Name, IP, Country)
Set Up the SDK
Initialize the SDK
Next, initialize the SDK with a client SDK key from the “API Keys” tab on the Statsig console. These keys are safe to embed in a client application.Along with the key, pass in a User Object with the attributes you’d like to target later on in a gate or experiment.
It is possible to configure the SDK to use cached values if they are newer than the local file.
This can be useful if you ship your app with a local file, but would like it to only be used for the first session.
In the following example, the SDK will only use initialSpecs if there is no cache or if the cache is older than initialSpecs.
How to add the scope
How to add the scope
- New SDK Keys
- Existing SDK Keys
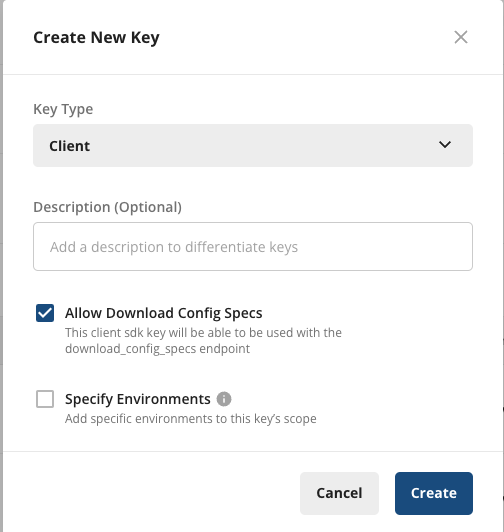
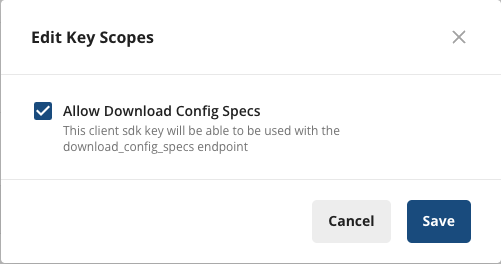
When creating a new client key, select “Allow Download Config Specs”

You can get a copy of your current specs data by visiting:
https://api.statsigcdn.com/v1/download_config_specs/client-{YOUR_SDK_KEY}.jsonWorking with the SDK
Checking a Feature Flag/Gate
Now that your SDK is initialized, let’s check a Feature Gate. Feature Gates can be used to create logic branches in code that can be rolled out to different users from the Statsig Console. Gates are always CLOSED or OFF (thinkreturn false;) by default.
Reading a Dynamic Config
Feature Gates can be very useful for simple on/off switches, with optional but advanced user targeting. However, if you want to be able send a different set of values (strings, numbers, and etc.) to your clients based on specific user attributes, e.g. country, Dynamic Configs can help you with that. The API is very similar to Feature Gates, but you get an entire json object you can configure on the server and you can fetch typed parameters from it. For example:Getting a Layer/Experiment
Then we have Layers/Experiments, which you can use to run A/B/n experiments. We offer two APIs, but we recommend the use of layers to enable quicker iterations with parameter reuse.Logging an Event
Now that you have a Feature Gate or an Experiment set up, you may want to track some custom events and see how your new features or different experiment groups affect these events. This is super easy with Statsig - simply call the Log Event API for the event, and you can additionally provide some value and/or an object of metadata to be logged together with the event:Code Examples
Working sample apps are available in the repository: Included are both Swift and Objective C uses.Statsig User
You need to provide a StatsigUser object to check/get your configurations. You should pass as much information as possible in order to take advantage of advanced gate and config conditions. Most of the time, theuserID field is needed in order to provide a consistent experience for a given
user (see logged-out experiments to understand how to correctly run experiments for logged-out
users).
Besides userID, we also have email, ip, userAgent, country, locale and appVersion as top-level fields on
StatsigUser. In addition, you can pass any key-value pairs in an object/dictionary to the custom field and be able to
create targeting based on them.
Once the user logs in or has an update/changed, make sure to call updateUser
with the updated userID and/or any other updated user attributes:
Private Attributes
Have sensitive user PII data that should not be logged? No problem, we have a solution for it! On the StatsigUser object we also have a field calledprivateAttributes, which is a simple object/dictionary that you can use to set private user attributes. Any attribute set in privateAttributes will only be used for evaluation/targeting, and removed from any logs before they are sent to Statsig server.
For example, if you have feature gates that should only pass for users with emails ending in “@statsig.com”, but do not want to log your users’ email addresses to Statsig, you can simply add the key-value pair { email: "my_user@statsig.com" } to privateAttributes on the user and that’s it!
Setting a Global User
To avoid needing to pass the user object to every single evaluation call, you can set a global user. This user will be used for all evaluations unless otherwise specified.Unlike precomputed evaluation SDKs, the on-device evaluation SDK does not have an `updateUser` method since it evaluates gates/configs/experiments in real-time for any user object you pass in.
Statsig Options
You can configure certain aspects of the SDKs behavior by passing a StatsigOptions object during initialization.The maximum number of events to batch before flushing logs to the server.
How frequently to flush queued logs.
The API where all events are sent.
The API used to fetch the latest configurations.
An object you can use to set environment variables that apply to all of your users in the same session and will be used for targeting purposes.
Lifecycle & Advanced Usage
Shutting Statsig Down
In order to save users’ data and battery usage, as well as prevent logged events from being dropped, we keep event logs in client cache and flush periodically. Because of this, some events may not have been sent when your app shuts down. To make sure all logged events are properly flushed or saved locally, you should tell Statsig to shutdown when your app is closing:Post Init Syncing
From Network
By default, the SDK will only sync during initialization. If you would like to re-sync after initialization, you can call theStatsig.update method.
This will trigger a network call to fetch the latest changes from the server.
From a Local File
If you maintain your own copy of the “specs” json, you can pass it in to the update withStatsig.updateSync(). This will skip the network call and use the provided specs instead.
Scheduled Polling
If you would like the SDK to regularly poll for updates, you can start the polling task withStatsig.scheduleBackgroundUpdates().
This will call Statsig.update internally, hitting the network and pulling down the latest changes.
Local Overrides
It is possible to override the values returned by the Statsig SDK. This can be useful in unit testing or for enabling features for local development. To get setup with local overrides, you can pass an instance ofLocalOverrideAdapter to the SDK via the StatsigOptions object.
It is possible to write your own override adapter. You can implement the
OverrideAdapter protocol and pass that in instead.FAQs
How do I run experiments for logged out users?
How do I run experiments for logged out users?
See the guide on device level experiments.


