Event Webhook
Configure event webhooks in Statsig to forward exposure, gate, and experiment events to your own HTTP endpoints in near real time.
Incoming
The Statsig Event Webhook lets you log event data to Statsig from third-party apps or other external sources to provide additional context to your Statsig experiments and metrics.
Before using the webhook, obtain your project's server secret key. An example call to the Statsig Event Webhook:
POST https://api.statsig.com/v1/webhooks/event_webhook
Content-Type: application/json
Accept: */*
STATSIG-API-KEY: {STATSIG_SERVER_SECRET}
{
  "user": {
    "userID": {USER_ID},
    ...
  },
  "event": {EVENT_NAME},
  "value": {VALUE},
  "metadata": {
    "example_field_1": {EXAMPLE_VALUE_1},
    "example_field_2": {EXAMPLE_VALUE_2},
    ...
  },
  timestamp: {TIMESTAMP}
}
Outgoing
If you're using a service that doesn't have an official Statsig integration, you can use the Generic Webhook integration.
This integration sends raw events to the provided webhook URL.
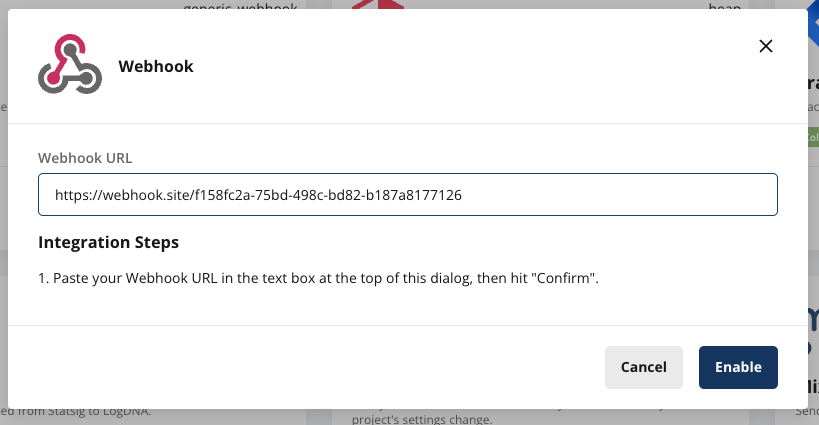
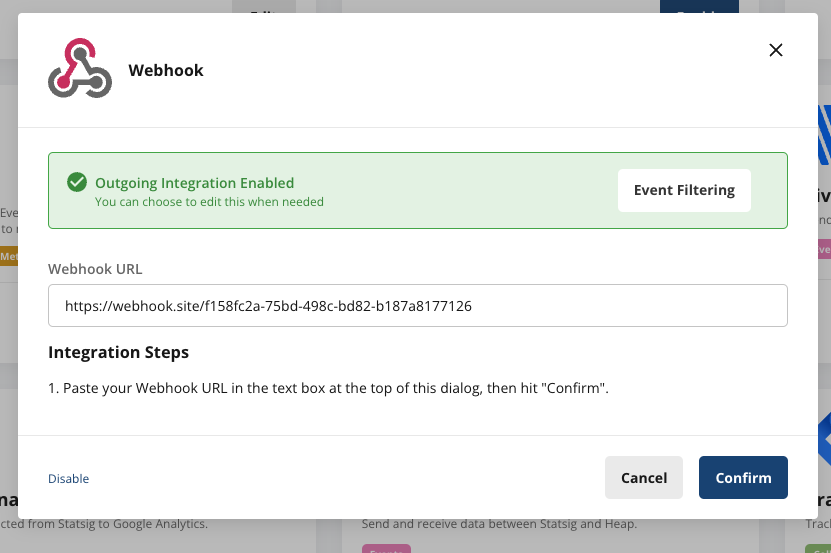
Setup
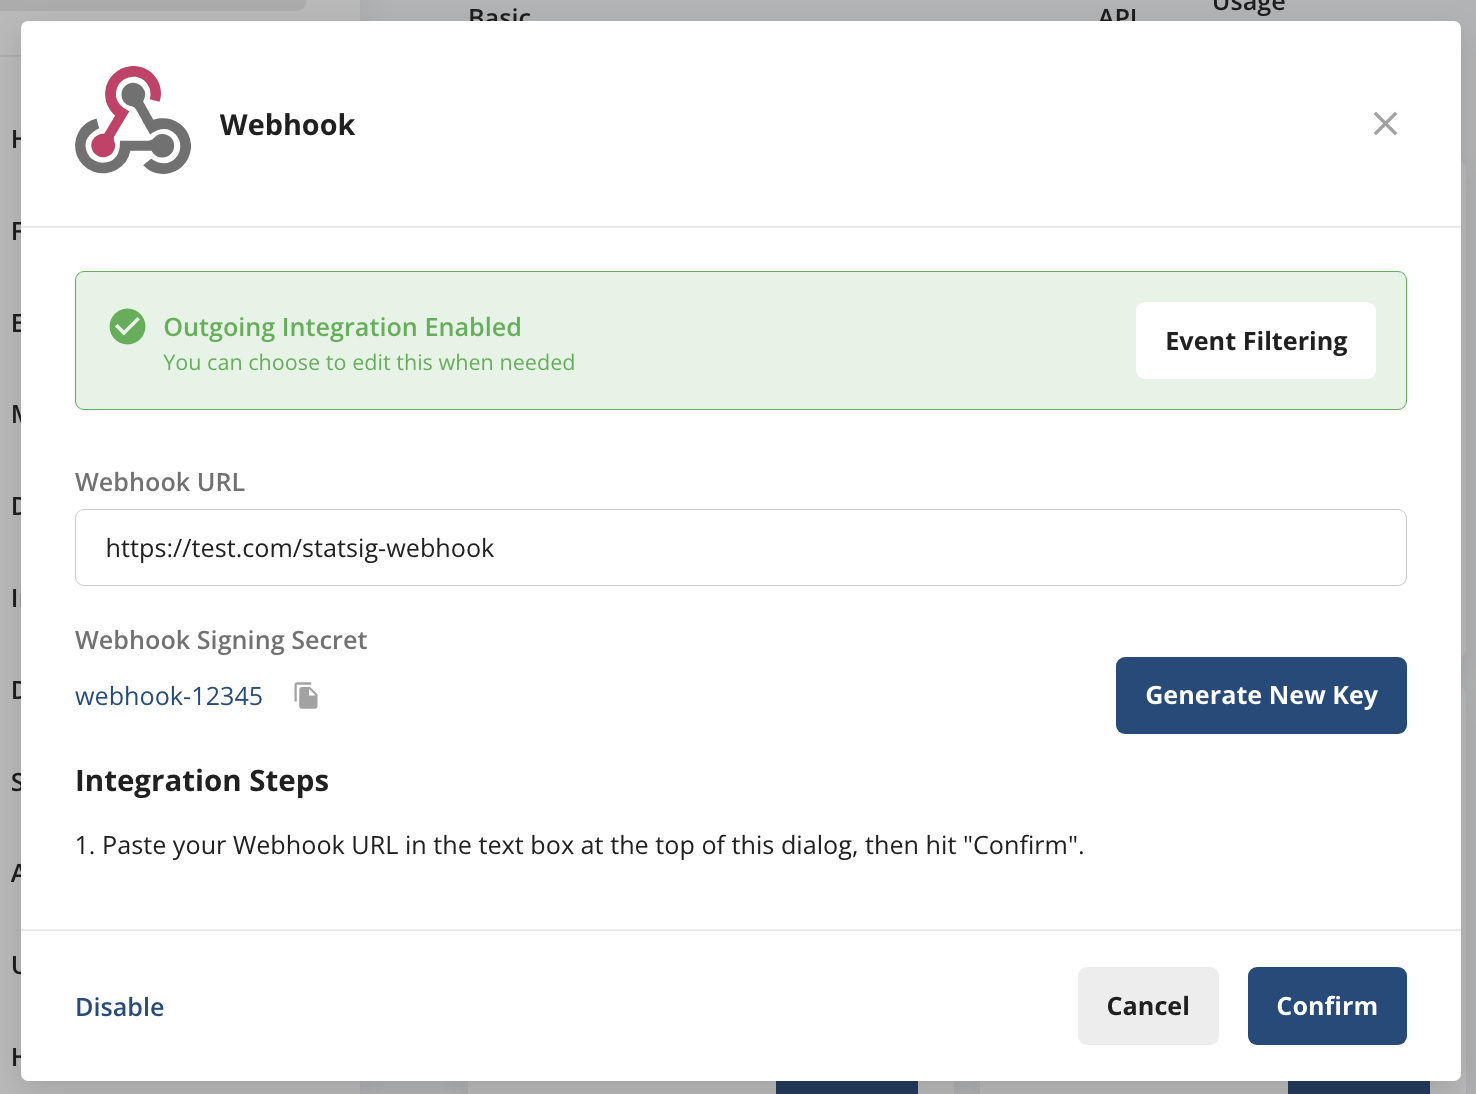
In your Project Settings, under the Integrations tab, enable the Generic Webhook integration.
In the dialog that appears, enter the URL of your destination webhook and select Enable to save the URL and enable this integration.
Runtime event webhooks
Statsig triggers these webhooks at runtime as it assigns users to gates and experiments, or as users trigger events.
Event format
Statsig sends events in batches in JSON format. The structure of a Statsig Event looks like the following:
| Field | Type | Description |
|---|---|---|
| eventName | String | Name of the event provided |
| user | JSON | Statsig User Object |
| userID | String | User ID provided |
| timestamp | Number | Timestamp in MS of the event |
| value | String | Value of the event provided |
| metadata | JSON | Custom Metadata provided |
| statsigMetadata | JSON | Metadata related to the logging of this event added by Statsig |
| timeUUID | String | UUID for the event |
| unitID | String | Unit ID of the exposure (e.g. userID, stableID, or the customID) |
Custom event formatting - logEvent
{
  "eventName": "my_custom_event",
  "user": {
    "userID": "a_user",
    "email": "a.user@email.com"
  },
  "userID": "a_user",
  "timestamp": "1655231253265",
  "statsigMetadata": {
    ...
  },
  "value": "a_custom_value",
  "metadata": {
    "key_a": "value_a",
    "key_b": "123"
  },
  "timeUUID": "abd2a983-ec0f-11ec-917a-fb8cdaeda578"
}
Feature gate exposure formatting - checkGate
{
  "eventName": "statsig::gate_exposure",
  "user": { ... },
  "userID": "a_user",
  "timestamp": "1655231253265",
  "statsigMetadata": { ... },
  "value": "",
  "metadata": {
    "gate": "a_gate",
    "gateValue": "false",
    "ruleID": "default",
    "reason": "Network",
    "time": "1655231249644"
  },
  "timeUUID": "8d7c1040-ec11-11ec-g123-abe2c32fcf46",
  "unitID": "userID"
}
Dynamic config exposure formatting - getConfig
{
  "eventName": "statsig::config_exposure",
  "user": { ... },
  "userID": "a_user",
  "timestamp": "1655231253265",
  "statsigMetadata": { ... },
  "value": "",
  "metadata": {
    "config": "a_config",
    "ruleID": "default",
    "reason": "Network",
    "time": "1655231249644"
  },
  "timeUUID": "af379f60-ec11-22ad-8e0a-05c3ee70bd0c",
  "unitID": "userID"
}
Experiment exposure formatting - getExperiment
{
  "eventName": "statsig::experiment_exposure",
  "user": { ... },
  "userID": "a_user",
  "timestamp": "1655232119734",
  "statsigMetadata": { ... },
  "value": "",
  "metadata": {
    "config": "an_experiment",
    "ruleID": "4SauZJcM1T7zNvh1igBjwE",
    "reason": "Network",
    "time": "1655231249644",
    "experimentGroupName": "Control"
  },
  "timeUUID": "af379f61-ab22-11ec-8e0a-05c3ee70bd0c",
  "unitID": "userID"
}
Example batch
[
  {
    "eventName": "page_view",
    "user": {"userID": "user_1", "country": "US"},
    "userID": "user_1",
    "timestamp": 1644520566967,
    "value": "example_value",
    "metadata": {"page": "home_page"},
    "statsigMetadata": {},
    "timeUUID": "f4c414a0-8ab5-11ec-a8a3-0242ac120002"
  },
  {
    "eventName": "statsig::gate_exposure",
    "user": {"userID": "user_1", "country": "US"},
    "userID": "user_1",
    "timestamp": 1644520566968,
    "value": "",
    "metadata": {"gate": "test_gate", "gateValue": "true", "ruleID": "default"},
    "statsigMetadata": {},
    "timeUUID": "f4c414a0-8ab5-11ec-a8a3-0242ac120003",
    "unitID": "userID"
  },
  {
    "eventName": "statsig::experiment_exposure"
    "user": {"userID": "user_1", "country": "US"},
    "userID": "user_1",
    "timestamp": 1644520566969,
    "value": "",
    "metadata": {
       "config": "an_experiment", "ruleID": "4SauZJcM1T7zNvh1igBjwE", "reason": "Network", "time": "1655231249644", "experimentGroupName": "Control"
    },
    "statsigMetadata": {},
    "timeUUID": "f4c414a0-8ab5-11ec-a8a3-0242ac120004",
    "unitID": "userID"
  }
]
<a name="event-filtering-dialog" />
Config change webhooks
Statsig triggers these webhooks when configuration changes take place within the Console. Each webhook request body contains a batch of change events in the following format: {"data": [<config-change>, <config-change>]}. Batches may contain 1 or more config change events.
Below are a few examples of config change payloads. To capture the full range of config webhook types and their payloads, run a local HTTP tunnel such as ngrok to log incoming webhooks.
Gate change
{
  "user": {
    "name": "Test User",
    "email": "testuser@email.com"
  },
  "timestamp": 1709660061095,
  "eventName": "statsig::config_change",
  "metadata": {
    "type": "Gate",
    "name": "layout_v2",
    "description": "Description: Change default page layout",
    "action": "created"
  }
}
Experiment change
{
  "user": {
    "name": "Test User",
    "email": "testuser@email.com"
  },
  "timestamp": 1709658507446,
  "eventName": "statsig::config_change",
  "metadata": {
    "type": "Experiment",
    "name": "heading_test",
    "description": "- Updated experiment settings\n    - Groups updated: control, test\n    - Parameters added: heading\n    - Parameters updated: directives",
    "action": "updated"
  }
}
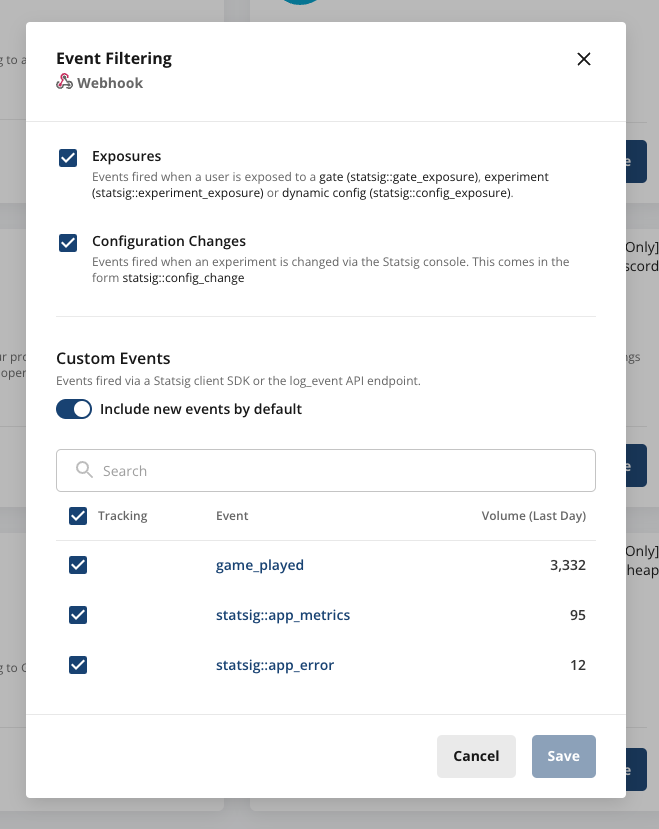
Filtering events
After you enable outbound events to your webhook, you can select which categories of Statsig events to export. Select Event Filtering, then check the appropriate boxes. There are 2 main types of events: Exposures (events logged through the SDK) and Config Changes (changelogs for Statsig Console).
Webhook signature
You can verify that a webhook request originates from Statsig using the Webhook Signature.
Follow these steps to verify the signature:
- Grab your webhook signing secret from your Webhook integration card.
- Extract the request time header 'X-Statsig-Request-Timestamp' from the webhook request.
- Concatenate the version number ("v0"), the timestamp, and the request body together, using a colon (:) as a delimiter to create a signature basestring. Here's an example of a possible base string:
v0:1671672194836:{"data":[{"user":{"name":"Joe Zeng","email":"joe@statsig.com"},"timestamp":1671672134833,"eventName":"statsig::config_change","metadata":{"type":"Gate","name":"test","description":"- Updated Rule test rollout from 100.00% to 10.00%","environment":"production"}}]}
- Hash the signature basestring, using the signing secret as a key, and take the hex digest of the hash. Create the full signature by prefixing the hex digest with the version number ("v0") and an equals sign. Refer to the sample pseudo code below.
statsig_signature = 'v0=' + hmac.compute_hash_sha256(
webhook_signing_secret,
signature_basestring
).hexdigest()
>>> 'v0=05c50d1513d49f884df8b0469befbbd432bd30364e81f16a606dec69f29e8f18'
- Compare the resulting signature to the 'X-Statsig-Signature' header on the request.
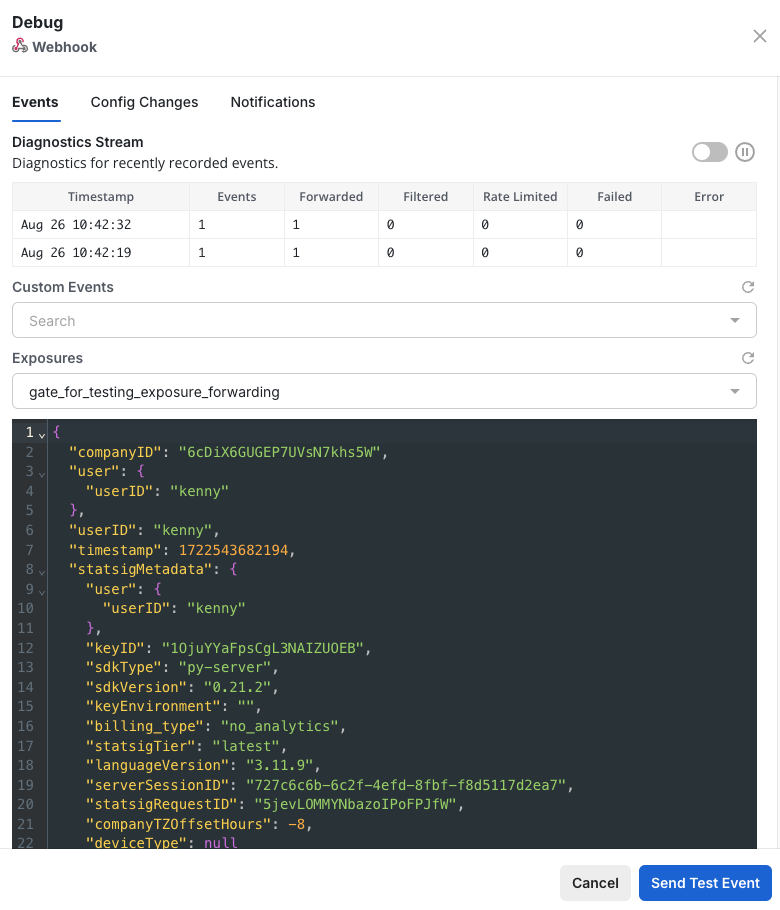
Developing and testing webhooks
The actual event payload may look different from the examples above. To test webhook configuration and see payloads before starting development, you can use a local HTTP tunnel such as ngrok.
You can also use the Debug tool to:
- View requests made to the webhook, including diagnostic information such as number of events forwarded/filtered, request header and body, and more.
- Send example requests to the webhook using any recently logged event or exposure.
Was this helpful?